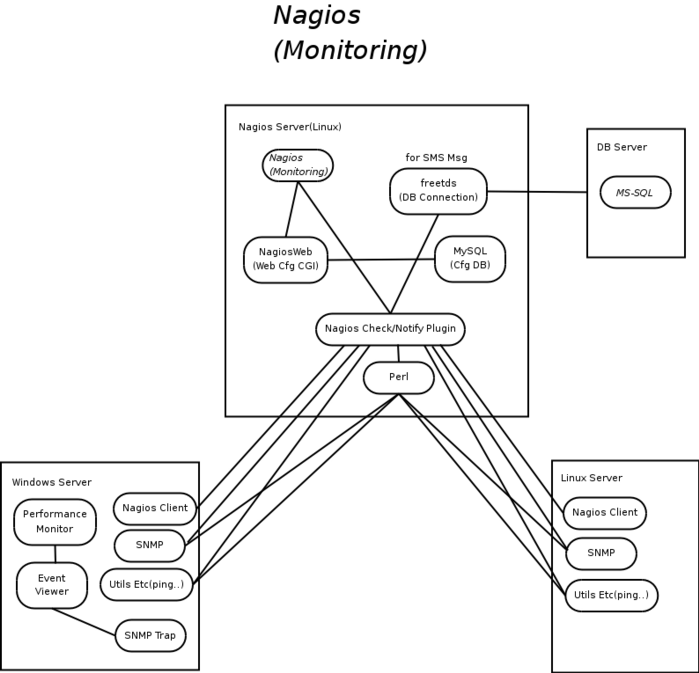
System Monitoring With Nagios How To
System Monitoring With Nagios HowTo ¶1.1. Nagios System Software Environment 
1.3.1. OS Setting.. 
1.3.2. nagios install 
1.3.3. nagios-plugin install 
1.3.4. external nagios-plugin install 
1.3.5. nagiosweb install 
  Configuration table 아래에 추가한다.
  <tr>
    <td width=13><img src="images/greendot.gif" width="13" height="14" name="config-dot1"></td>
    <td nowrap><a href="/nagiosweb/hostlist.php" target="main" onMouseOver="switchdot('config-dot1',1)" onMouseOut="switchdot('config-dot1',0)" class="NavBarItem">Hosts</
a></td>
  </tr>
  <tr>
    <td width=13><img src="images/greendot.gif" width="13" height="14" name="config-dot2"></td>
    <td nowrap><a href="/nagiosweb/hostgrouplist.php" target="main" onMouseOver="switchdot('config-dot2',1)" onMouseOut="switchdot('config-dot2',0)" class="NavBarItem">Ho
st
      Groups</a></td>
  </tr>
  <tr>
    <td width=13><img src="images/greendot.gif" width="13" height="14" name="config-dot3"></td>
    <td nowrap><a href="/nagiosweb/servicelist.php" target="main" onMouseOver="switchdot('config-dot3',1)" onMouseOut="switchdot('config-dot3',0)" class="NavBarItem">Serv
ices</a></td>
  </tr>
  <tr>
    <td width=13><img src="images/greendot.gif" width="13" height="14" name="config-dot10"></td>
    <td nowrap><a href="/nagiosweb/servicegrouplist.php" target="main" onMouseOver="switchdot('config-dot10',1)" onMouseOut="switchdot('config-dot10',0)" class="NavBarIte
m">Service Groups</a></td>
  </tr>
  <tr>
    <td width=13><img src="images/greendot.gif" width="13" height="14" name="config-dot4"></td>
    <td nowrap><a href="/nagiosweb/contactlist.php" target="main" onMouseOver="switchdot('config-dot4',1)" onMouseOut="switchdot('config-dot4',0)" class="NavBarItem">Cont
acts</a></td>
  </tr>
  <tr>
    <td width=13><img src="images/greendot.gif" width="13" height="14" name="config-dot5"></td>
    <td nowrap><a href="/nagiosweb/contactgrouplist.php" target="main" onMouseOver="switchdot('config-dot5',1)" onMouseOut="switchdot('config-dot5',0)" class="NavBarItem"
>Contact
      Groups</a></td>
  </tr>
  <tr>
    <td width=13><img src="images/greendot.gif" width="13" height="14" name="config-dot6"></td>
    <td nowrap><a href="/nagiosweb/timeperiodlist.php" target="main" onMouseOver="switchdot('config-dot6',1)" onMouseOut="switchdot('config-dot6',0)" class="NavBarItem">T
ime Periods</a></td>
  </tr>
  <tr>
    <td width=13><img src="images/greendot.gif" width="13" height="14" name="config-dot7"></td>
    <td nowrap><a href="/nagiosweb/checkcommandlist.php" target="main" onMouseOver="switchdot('config-dot7',1)" onMouseOut="switchdot('config-dot7',0)" class="NavBarItem"
>Check Commands</a></td>
  </tr>
  <tr>
    <td width=13><img src="images/greendot.gif" width="13" height="14" name="config-dot8"></td>
    <td nowrap><a href="/nagiosweb/notifylist.php" target="main" onMouseOver="switchdot('config-dot8',1)" onMouseOut="switchdot('config-dot8',0)" class="NavBarItem">Notif
y Commands</a></td>
  </tr>
  <tr>
    <td width=13><img src="images/greendot.gif" width="13" height="14" name="config-dot9"></td>
    <td nowrap><a href="/nagiosweb/runscript.php" target="main" onMouseOver="switchdot('config-dot9',1)" onMouseOut="switchdot('config-dot9',0)" class="NavBarItem">Write
Config</a></td>
  </tr>
1.3.6. perl & perl-usd-install 
1.3.7. 참고:freedts install(python으로 mssql디비에 접근하실때 설치) ¶참고: sms 전송시 mssql db를 사용하는 경우에 한해 설정한다.
다른 방법일 경우 다르게 설정
export SYBASE=/usr/local/freetds 환경변수 설정
가. FreeTDS 설치
1.3.8. linux snmp configuration 
# rwuser: a SNMPv3 read-write user
#   arguments:  user [noauth|auth|priv] [restriction_oid]

rwuser  snmpuser noauth

#
# Unknown directives read in from other files by snmpconf
#
com2sec local   localhost       private
com2sec local1  127.0.0.1       public
com2sec mynetwork 192.168.2.21  public
com2sec mynetwork 192.168.2.23  public

# 커뮤니티네임과 시큐리티네임을 정한다.
# First, map the community name "public" into a "security name"
#       sec.name        source  community
com2sec notConfigGroup default  public

# Second, map the security name into a group name;
#       groupName       securityModel   securityName
group   notConfigGroup  v1      public
group   notConfigGroup  v2c     public
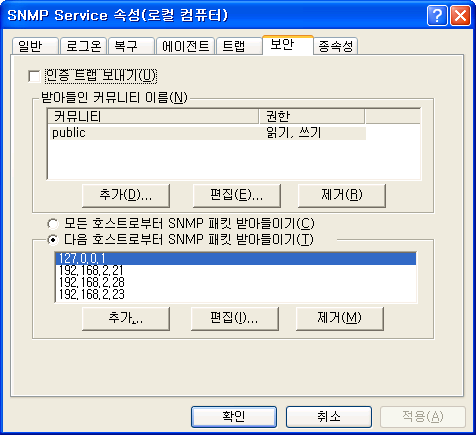
1.3.9. windows snmp configuration 
 [PNG image (12.15 KB)]
1.4. Configuration 
1.7. 관련 자료 
|
You will step on the soil of many countries. |


.png) 심승준 ( ftfuture at hitel.net)
심승준 ( ftfuture at hitel.net)

